How to Regrind Drills with a Turning-Style Chipbreaker for Longer Tool Life on SUS316 saving $7,500 year
ROI is unusually high because the declared investment is very small compared with the monthly saving.
Current problem:
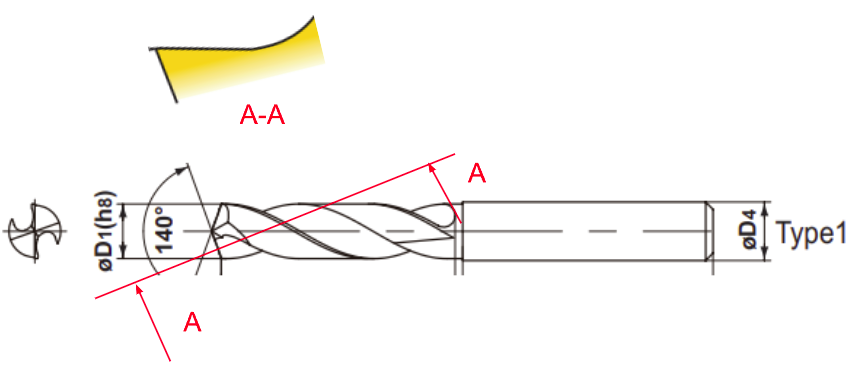
The part has a pre-existing Ø9 hole that needs to be drilled out to Ø11.2. Material: SUS316 stainless steel. A new drill lasts 20,000 cycles. After regrinding, it only lasts 5,000 cycles.
Root cause:
The drill was not reground with the right geometry for cutting SUS316. At a feed of 0.2 mm/rev, which is on the high side, the tool wears out much faster.
Improvement mechanism:
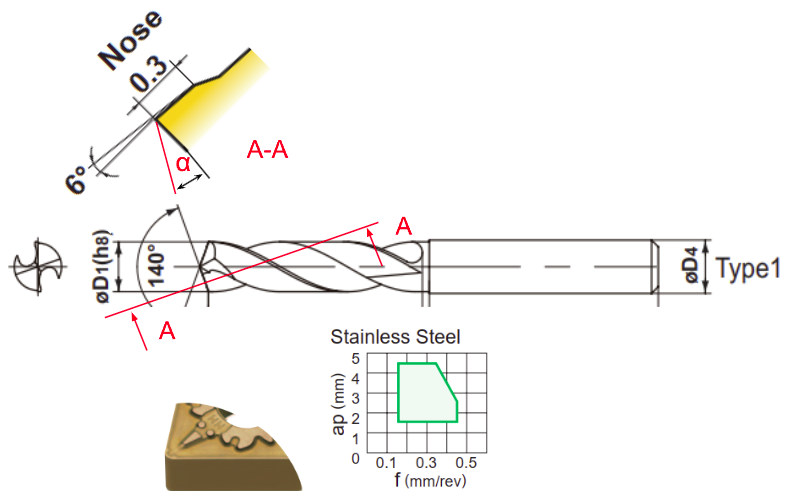
Take the cutting-edge geometry used on turning inserts and apply it to the drill.
Solution:
Regrind the drill with a chipbreaker similar to a turning insert, with a land width of 0.2–0.3 mm at the nose.
Result:
Before the improvement, the cost items declared in this case ran at $1,500 per month.
After the improvement, those same items run at $875 per month.
The saving is $625 per month, or $7,500 per year - a 41.7% reduction measured against the cost of the items declared in this case (Consumable), not against the full product cost.
The investment is $170, itemised as 1 entries in the one-off implementation cost table.
The payback time is ~8 days.
Lessons learned:
At first I simply ground the drill the way the university textbook showed. There's no such thing as a chipbreaker there. After running a lot of drills that fell short of the expected life for quite a long time, I went to the Mitsubishi catalog. Drills there don't have a chipbreaker either. The manufacturer doesn't mention chipbreakers on drills at all. Then I went back through the books and read further into the turning tool section, and turning tools do have chipbreakers. That's where it got interesting: when I compared the chipbreaker on a turning insert with the shape of a new drill point, they turned out to be similar.
Reusable knowledge
Where this applies:
You need to know how to use a drill grinder well enough to shape the drill point to dimensions similar to a turning insert. I didn't know how at first either. It's a basic machine, the company bought it, and I had to figure it out myself. I used what I learned about tool geometry at university, plus the tool manufacturer's catalog, to work out a grinding method that gave me the geometry I wanted.
Risks:
The primary clearance angle α of the drill must always be greater than 0, and here α = 7°. Watch this carefully while grinding. If you don't understand tool geometry, you may not get it right. If this angle reaches 0, the tool cannot cut. Any tool, whether it's a turning tool, a milling cutter or a drill, will wear to a certain point. If you check it at that point, you'll see that the wear has brought this angle down to α = 0, and that is exactly when the tool stops cutting.
Author's evidence:
Once the drill is ground correctly, its life goes back up to nearly the same as a new drill. Tool life also becomes stable instead of varying from drill to drill. This is a roughing tool, not a finishing tool, so you don't need a lot of data. Averaging 5 drills on 5 machines is enough to get a reliable average tool life. Then set the tool change interval at 80% of that average. If you run the drill to its full life, it will still cut without affecting the surface, but at regrinding more material has to be ground away and the regrind takes more work.
Reusable idea:
The chipbreaker on a drill and on a turning tool is the same idea. This matters most when the material being machined is SUS316.
Tools and materials used in this case
- MZE1120SA-VP15TF — MITSUBISHI_MAT (TOOL_DRILL_CARBIDE)