How to Fix a Worn Micrometer by Replacing the Anvil and Spindle Instead of Buying a New One
ROI is unusually high because the declared investment is very small compared with the monthly saving.
Current problem:
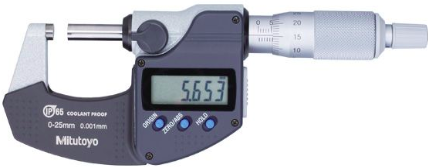
Mitutoyo 293-821-30, price $108. This electronic outside micrometer wears out after roughly one year of use. Mitutoyo's own manufacturing tolerance, and our incoming-inspection standard for a new unit, is 0.002 [mm]. Our calibration standard for a gauge is one-quarter of the product tolerance. The product tolerance we commonly check against is ±0.05, so our internal standard works out to ±0.005. In practice: when calibrating against a gauge block, if the deviation from the reference is 0.006 or more, that micrometer gets scrapped. Beyond that, there was a case where defects turned up because an old micrometer measured a part as OK, but a new micrometer measured the same part as NG — even though both had passed calibration. Digging further, the reason two micrometers gave different readings despite both calibrating fine was this: a new micrometer, when used over and over on the same round part's diameter at one contact spot, wears unevenly on its measuring face. It develops a dip shaped like the cylinder of the part it's been measuring. So the inspection department added an internal check: verifying with a ball gauge. If the deviation between measuring positions is 0.006 or more, the micrometer is considered bad and has to be scrapped.
Root cause:
Measuring parts at the same single spot too many times wears down the measuring face — exactly as analyzed above.
Improvement mechanism:
Spread the contact out across multiple spots instead of concentrating it on one.
Solution:
Rotate the measuring position — by rotating which part gets checked with a given micrometer, from part A to part B to part C. But honestly, that's not what I actually did. No particular reason — I simply never got around to it. Anyone reading this is welcome to try that route. Maybe because I come from a technical background, I tend to dig deeper on the engineering side. After studying the assembly drawing of the electronic outside micrometer, I realized the worn part could just be replaced — same as back when I worked in maintenance: whatever part fails, you swap that part. As it turns out, the supplier does sell the spindle face and the anvil as separate parts. So I ordered them in to try. The first three times I replaced them, none of them passed. Analyzing why, I realized the two measuring faces need to be almost perfectly parallel — because the spindle face rotates as it advances during a measurement, so if the faces aren't parallel, it fails calibration against the ball gauge. So to get the two faces properly parallel, I walked my team through it step by step: 1. Remove the anvil. 2. Fit the new anvil. While bonding it in place with two-part (A/B) epoxy, use the spindle face as the reference — press it firmly against the anvil face for the whole time the glue cures, within 24 hours. 3. Remove the spindle face. 4. Fit the new spindle face. 5. Calibrate. If it fails, replace again. The success rate climbed day by day, and once the team had the technique down, it hit 100%.
Result:
Before the improvement, the cost items declared in this case ran at $540 per month.
After the improvement, those same items run at $0 per month.
The saving is $540 per month, or $6,480 per year - a 100.0% reduction measured against the cost of the items declared in this case (Consumable), not against the full product cost.
The investment is $8, itemised as 1 entries in the one-off implementation cost table.
The payback time is < 1 days.
Lessons learned:
It took me two years of thinking about this before I actually worked out this improvement. This micrometer type makes up about 30% of the basic measuring gauges in our inspection department, so the payoff scales up a lot. The benefit is also permanent, in a way a product improvement never is — a product's production run lasts at most maybe 20 years, but measuring gauges are pretty much forever. Even now that AI exists, people are still using them — ha ha ha.
Reusable knowledge
Where this applies:
No special requirement needed.
Risks:
Needs monitoring under the shop floor's high-temperature environment, watching for any abnormal deviation compared with other micrometers. After confirming, I found nothing out of the ordinary, so I rolled it out across the board.
Author's evidence:
Replace and calibrate repeatedly. Check the wear cycle of the repaired micrometers against 5 brand-new ones. Hitting 70% of the old micrometer's life is considered OK.
Reusable idea:
I've already rolled this out to other gauge types, including: Replacing the measuring faces on flat/blade micrometers. Replacing the measuring faces on inside (bore) micrometers.
Tools and materials used in this case
- Mitutoyo 293-821-30 — MITUTOYO (OTHER)